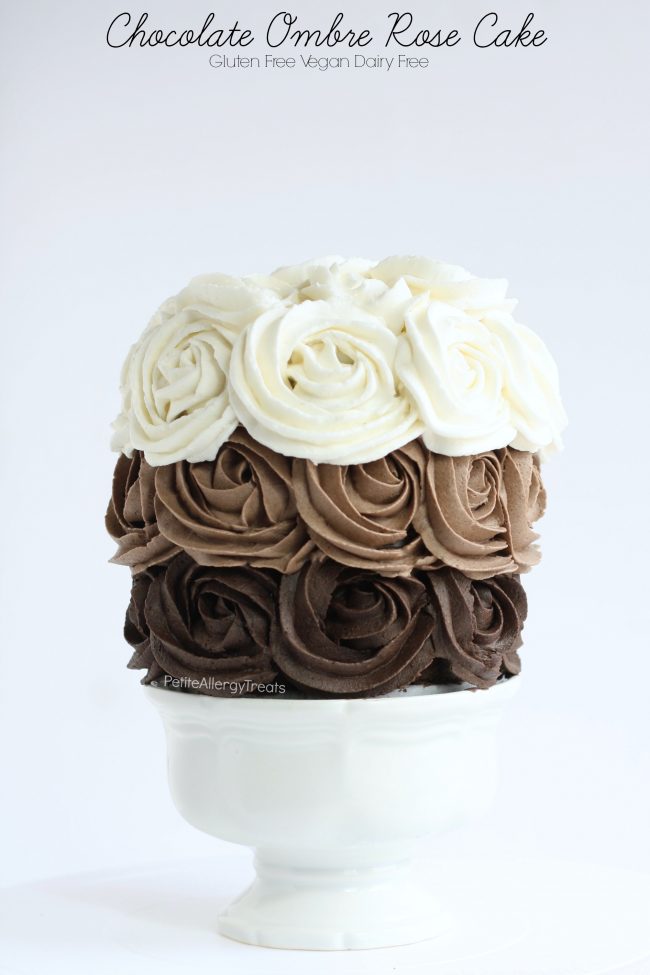
Gluten Free Vegan Chocolate Cake (Dairy Free)
Author: Laura @ Petite Allergy Treats
Serves: 1 Mini Cake
Ingredients
Cake
- 1 cup Gluten Free Enjoy Life All Purpose Mix
- ½ cup dutch cocoa
- 4 Tbsp vegetable oil
- ½ cup maple syrup
- ½ cup +1 Tbsp dairy free milk of choice
- ¼ cup white sugar
- 2 tsp vanilla
- 1 tsp baking powder
- 1 tsp baking soda
- ¾ tsp apple cider vinegar
- ¼ tsp sea salt
- ½ tsp ground flax seed or ground psyllium husks
Frosting
BASE for Light and Dark Chocolate Frosting
- 1½ cups palm shortening
- 1½ cups powdered sugar
- pinch of salt optional
- DIVIDE in half for light and dark frosting.
Light Chocolate Frosting
- half of frosting base above
- ¼ cup additional palm shortening
- 2 Tbsp cocoa powder
- 2 Tbsp powdered sugar
- ½-1 tsp dairy free milk of choice
Dark Chocolate Frosting
- half of frosting base above
- ½ cup additional palm shortening
- ¼ cup cocoa powder
- 2 tsp dairy free milk of choice
Instructions
- Preheat oven to 350 F for 20 minutes.
- Combine all dry ingredients and mix well.
- Using a mixer, add all remaining liquid except apple cider vinegar and mix until smooth. Batter will appear thin and thicken up after a few minutes.
- Add apple cider vinegar and mix well and immediately pour batter into 2 greased 4inch pans. Place pans on a baking sheet and bake for 30-33 minutes or until toothpick comes out clean in the center. Allow to cool completely in the pans before removing.
- Remove cakes and trim tops with a serrated knife to level. Cut each cake in half by gently tracing the cut first and gradually slice through the cake while rotating. (Patience with cutting will yield less crumbs and less chance of breaking)
- Frosting: Apply a small dollop of frosting to the plate where the cake stay and be decorated. (No moving the cake after this point). Stack the first layer on top and apply approximately ¼ inch of icing to be evenly spread. Start with all the frosting in the center and gently push down only moving the frosting in the center out to the edges in a gentle circular motion. (See Notes*) Repeat steps with 2 more layers.
- The top layer of the cake will be a thin crumb coat of frosting. Thinly (and gently) apply frosting to the top and outsides of the cake. Start at the top center in a circular motion to gradually create an even thin layer and allow icing to waterfall over the sides of the cake. Fill in any gaps within the layers with icing.
- Half way down the cake switch frosting colors to light chocolate then dark chocolate for the base.
- Place cake in refrigerator or freezer for 15 minutes to firm up.
- Roses- Fill 3 bags of colored frosting. Use an additional empty bag which will contain the decorating tip, cut the bottom of the bag to fit tip. Each frosting color bag will be used to lined the empty bag with the tip, making it easy to access and wash the tip between color changes.
- Begin with the darkest chocolate frosting at the bottom of the cake. Apply even pressure when creating the roses. Firmly first squeeze frosting on the cake towards you and then pull up slightly and begin the rotation of the rose ending approximately where you began. See video here for help.
- Repeat steps until roses fill the entire row.
- Remove dark chocolate frosting bag from Tip bag. Thoroughly wash tip. Repeat steps above with lighter chocolate and white frosting rows.
- For the top white rose layer, work from the outside in to cover the entire cake with roses.
Frosting
- Make the first batch of white dairy free frosting. Place in a clean bowl and set aside.
- Use the mixer (not need to clean) to start the light and dark frosting base.
- Cream shortening until light and fluffy (10 minutes). Add Gradually add sifted powdered sugar ¼ cup at a time, scraping down the edges in-between.
- Divide frosting in half, leaving half of the frosting in the bowl.
- LIGHT CHOCOLATE FROSTING- Cream extra shortening until well incorporated. Add cocoa powder mixing well. Scrap down sides and add powdered sugar and dairy free milk, mix well until light and fluffy. Remove frosting to a separate bowl and set aside.
- DARK CHOCOLATE FROSTING- Add the reserved white frosting base, cream extra shortening until well incorporated. Add cocoa powder mixing well. Scrap down sides and add powdered sugar, dairy free milk and mix well until light and fluffy. Remove frosting to a separate bowl and set aside.
Notes
Cake- allowing the cake to fully cool will help the cake remain intact. Use a serrated knife and gently push and rotate while slicing the cakes in half. Tracing lightly first will help create even layers. Remember, push knife in, slightly rotate, and push knife in and slightly rotate to 'slice'...
Frosting-
The lightest frosting should be made first to avoid cleaning the mixer and bowl. Start with a full batch of dairy free white frosting, next base for light and dark chocolate. Mix lighter chocolate then dark chocolate frosting. There will be extras of all frosting; the roses use a lot of frosting and you won't want to run out half way through! Be sure to apply a thin crumb coat with the white frosting so you'll have plenty left for the roses.
The technique for the roses should be practiced before apply to the cake. For a better description (and if you're a visual learner) see the video here and here from I Am Baker.
Refrigerating the cake will help keep the shape of the roses as well as for cutting cleaning slices. This cake is the perfect serving for 2-3 people. Freeze leftovers to enjoy another day!
Tools listed are only suggestions to make things easier and faster. A metal open star tip is better than a plastic tip for crisper piping of designs and clean better in hot water.
Recipe by Petite Allergy Treats at https://petiteallergytreats.com/gluten-free-vegan-chocolate-cake-roses-dairy-free/